Hardness is the resistance of a material to permanent indentation. Hardness is not a material property but is an empirical test. There are several different hardness tests that will each determine a different hardness value for the same piece of material. Therefore, hardness is test method dependent and every test result has to have a label identifying the test method used. Since hardness value or number has no intrinsic significance, it cannot be utilized directly in design like tensile test value. The hardness value is useful for comparison between different materials or treatments (cold work, heat treatment, etc.). Hardness testing is widely used for inspection and process control and the results are used in estimating other mechanical properties like tensile strength. Information about various hardness tests is given in this article. Though durometer hardness is not used for metals, for completeness and to keep all types of hardness testing information at one place, information about durometer hardness is also given in this article.
Various hardness tests may be divided into three categories as under.
- Elastic hardness
- Resistance to cutting or abrasion
- Resistance to indentation
Elastic Hardness
This type of hardness is measured by a device known as scleroscope. In this device, a diamond-tipped hammer in a graduated glass tube is allowed to fall from a known height on the specimen to be tested. The hardness number depends on the height to which the hammer rebounds. Harder the material, the higher is the rebound. When the hammer is raised to the testing position, it has a certain amount of potential energy due to its weight. When it is released, this energy is converted to kinetic energy. On touching the test piece, some of this energy is consumed in forming the impression on test piece and the rest is used to rebound the hammer. This height of rebound can be measured from the graduation. Thus this test measures the resilience of a material, that is, the energy it can absorb in the elastic range.
Resistance to Cutting or Abrasion
Abrasion is the process of rubbing, grinding or wearing away by friction. The resistance of material to cutting or abrasion is measured by two methods as under.
Scratch Test
This test was developed by Friedrich Mohs. Its scale consists of 10 different standard minerals arranged in order of increasing hardness. Softest material talc is given No.1, then gypsum is given No.2 and so on and the hardest material, diamond is given No. 10. To measure hardness of a material, it is scratched by different minerals. For example, if a material is scratched noticeably by No. 7 mineral and not by No. 6 mineral, its hardness value is between 6 and 7. Nonuniform scale for hardness is the main disadvantage of this method.
File Test
In this test, the test piece is subjected to the cutting action of a file of known hardness to determine whether a visible cut is produced. Though the test is not very accurate, it is useful in quickly carrying out inspection of large number of parts. By running a file across the surface, an inspector can quickly check a large number of heat treated parts to determine whether the treatment has been satisfactory.
Resistance to Indentation
This test is carried out by impressing into the specimen resting on a rigid platform. Impressing is carried out by applying a known static load on an indenter of fixed and known geometry. Depending on the type of test, the hardness is expressed by a number that is inversely proportional to either area or depth of indentation (smaller the area or depth of indentation, higher the hardness number). Various methods of testing by indentation are as under.
Brinell Hardness Test
The brinell hardness tester generally consists of a vertical hydraulic press designed to force a ball indenter into the test specimen.
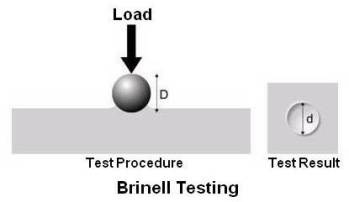
Standard procedure requires that the test be made with a ball of 10 mm diameter under a load of 3000 kg for hard materials (ferrous materials) and a 1500 or 500 kg for thin or soft materials (nonferrous metals). The ball is kept pressed into the specimen for at least 15 seconds. After the load is released, the diameter of the impression produced is measured by means of a microscope fitted with a scale having least count of 0.05 mm.
Measure two diameters of the indentation at right angles. If the two diameters differ by more than 0.1 mm, the reading should be discarded and new indentation should be made.
The Brinell hardness number (HB) is the ratio of the load in kilograms to the impressed area in square millimeters, as is calculated by following formula.

Where,
L = test load, kg
D = diameter of ball, mm and
d = diameter of impression, mm
Calculation is usually not required as tables are available for converting the observed diameter of impression to the Brinell hardness number.
The Brinell hardness number followed by the symbol HB without any suffix numbers denotes standard testing conditions – application of 3000 kg load for 15 seconds on a ball of 10 mm diameter. For other conditions, the hardness number and symbol HB are supplemented by numbers indicating the test condition in following order: diameter of ball, load and duration of loading.
The standard ball is used for material having Brinell hardness number up to approximately 450 HB. With harder material there is a tendency for ball to start deforming leading to erroneous values. The upper limit of the scale may be extended by using tungsten carbide ball rather than a hardened steel ball. With tungsten carbide ball it is possible to measure hardness up to approximately 650 HB. The Brinell hardness test is not recommended for materials having a hardness over 650 HB.
For more information on Brinell test, please refer ASTM E10 – Test Method for Brinell Hardness of Metallic Materials.
Rockwell Hardness Test
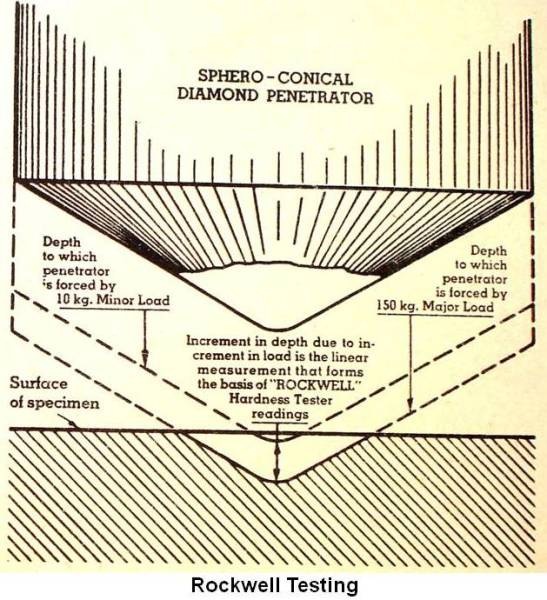
This hardness test uses a direct reading instrument based on the principle of differential depth measurement. The test is carried out by slowly raising the specimen against the indenter (or lowering the indenter down on the specimen) until a fixed minor load has been applied. This can be seen on the dial gauge. Then the major load is applied. After the dial pointer comes to rest, the major load is removed and, with the minor load still acting, the Rockwell hardness number is read on the dial gauge.
There are two types of Rockwell machines. The normal tester for relatively thick sections and the superficial tester for thin sections. The minor load is 10 kg on the normal tester and 3 kg on the superficial tester.
A variety of indenters and loads may be used, and each combination determines a particular Rockwell scale. Hard steel balls of 1/16, 1/8, 1/4 and 1/2 inch diameters and a 120° conical diamond (bale) point are used as indenters. Major loads are usually 60, 100 and 150 kg on the normal tester and 15, 30 and 45 kg on the superficial tester. There are many scales (A, B, C, D, E, F, G, H, K, L, M, P, R, S and V) depending on various combinations of different indenters and loads.
The most commonly used Rockwell scales are the B (1/16 inch ball indenter and 100 kg load) and the C (diamond indenter and 150 kg load), both obtained with the normal tester. Since there are many Rockwell scales, the hardness number must be specified by using the symbol HR followed by letter designating the scale and preceded by the hardness number. For example, 90 HRB means a Rockwell hardness of 90 measured on the B scale (1/16 inch ball indenter and 100 kg load).
Table given below gives information on penetrator, load and typical application for some Rockwell scales.
| Rockwell Scale | Penetrator Diameter if Ball, mm (in) | Load, kg | Typical Application |
|---|---|---|---|
| A | Diamond point | 60 | Tool materials |
| D | Diamond point | 100 | Cast irons, sheet steels |
| C | Diamond point | 150 | Steels, hard cast irons, Ti alloys |
| B | 1.588 (0.0625) | 100 | Soft steels, Cu and Al alloys |
| E | 3.175 (0.125) | 100 | Al and Mg alloys, other soft metals; reinforced polymers |
| M | 6.35 (0.250) | 100 | Very soft metals; high modulus polymers |
| R | 12.70 (0.500) | 60 | Very soft metals; low modulus polymers |
The calibration of the machine should be checked periodically with standard test blocks supplied by the machine manufacturer. During operation of the machine, the lever used to apply major load should be released gently to its starting position. Snapping the lever may give erroneous reading. Care shall be also taken to fix the anvil and indenter firmly. Any vertical movement at these points will result in erroneous depth resulting in wrong readings.
For more information on Rockwell test, please refer ASTM E18 – Test Methods for Rockwell Hardness of Metallic Materials.
Vickers Hardness Test
In this test, the tester uses a square based diamond pyramid indenter with an included angle of 136° between opposite faces. The load range is usually between 1 kg and 120 kg. This tester operates on the same basic principle as for Brinell tester. In this tester, square impression is formed on the specimen surface due to pyramid shape of the indenter. Length of the diagonal of the square is measured by the microscope fitted on the tester.
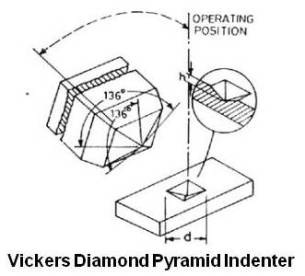
Vickers pyramid hardness number (HV) is calculated by the following formula.

Where,
L = applied load, kg and
d = diagonal length of square impression, mm
Here also calculation is usually not required as tables are available for converting the observed diagonal length of impression to the Vickers pyramid hardness number.
The Vickers number, which normally ranges from HV 100 to HV1000 for metals, will increase as the sample gets harder.
A typical Vickers hardness is specified as: 356HV0.5
Where 356 is the calculated hardness and 0.5 is the test force in kg.
Due to variety of applied loads, the Vickers tester is useful for measuring the hardness of very thin as well as thick sections.
For more information on Vickers hardness test, please refer ASTM E92 – Test Method for Vickers Hardness of Metallic Materials
Micro Hardness Tests
Micro hardness tests are carried out by making small indentations. To make small indentations, small test loads between 1 gm and 1000 gm are applied. Tests are carried out by two types of indenters. One is 136° square base Vickers diamond indicator and the other is the elongated Knoop diamond indenter.
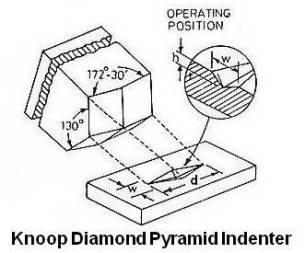
Knoop diamond indenter is ground to pyramid shape having included longitudinal and transverse angles of 172°30’ and 130° respectively. The indenter produces a diamond shaped indentation with long and short diagonals having approximate ratio of 7:1. As in the case of Vickers test, the long diagonal is measured using the microscope fitted on the tester. The knoop hardness number is calculated using the following formula.

Where,
L = applied load, kg and
d = length of long diagonal, mm
The Knoop number, which normally ranges from 60 to 1000 for metals, will increase as the sample gets harder.
A typical Knoop hardness is specified as: 450HK0.5
Where 450 is the calculated hardness and 0.5 is the test force in kg.
For more information on micro hardness test, please refer ASTM E384 – Test Method for Microindentation Hardness of Materials.
Accuracy of Hardness Tests
Some of the factors that affect the accuracy of hardness tests are as under.
- Condition of the indenter: Deformed and damaged indenter will give wrong values.
- Accuracy of applied loads: Loads beyond recommended values will give wrong values.
- Surface condition and shape of the specimen: The surface should be flat and representative of sound material. A flat surface should be prepared if possible on cylindrical shaped specimen and it may be supported in V-notch anvil.
- Thickness: The specimen should be thick enough so that no bulge or other marking showing the effect of load appears on the side of the piece opposite the indentation. The recommended thickness is at least 10 times the depth of indentation.
- Location of impressions: The distance of the center of the indentation from the edge of specimen or edge of another indentation must be at least two and one-half times the diameter of the indentation.
- Number of readings: It is necessary to take many readings if the impression is small to obtain a true average value. Generally three readings are taken to average out the value.
Selection of Hardness Testing Method
Selection of a hardness testing method is done based on ease of testing and degree of accuracy desired.
As Brinell test leaves relatively large impressions, it is used for heavy sections. However it does not require a very smooth surface and gives better result when the material is not homogeneous or nonuniform in microstructure. Using a microscope to measure the diameter of the impression is not very convenient.
The Rockwell test is rapid and simple in operation. It is very easy to read the hardness value on the dial gauge. The test may be used for thinner sections and can be used for testing hardest as well as softest materials. However, it requires smooth surface for testing.
The Vickers tester is the most sensitive of the production testers. Since light loads can be used, it can test thinner sections than any other methods. The square indentation is also easy to measure accurately.
Scleroscope leaves only small impression after testing. The test can be carried out rapidly and the instrument is portable. In this method, the tube must be perpendicular to the test piece and the test piece should be properly supported. Thus, the results tend to be inaccurate unless proper precautions are taken.
The microhardness test is basically a laboratory test.
Portable Hardness Tester
Many times you have to take your hardness tester along with you to the work site for in-situ measurement. For this kind of use, several handy devices have been invented and patented.
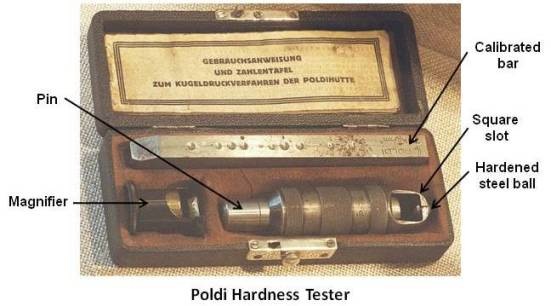
One of these is the Poldi-hammer shown in the figure given above. The hammer type portable impact hardness tester is useful for simple and quick determination of Brinell hardness of metals such as steel, Cast Iron, Brass, Aluminium, Copper etc. Due to easy handling and maneuverability, this tester is most suitable for testing heavy castings and other components, difficult to be carried to a table type hardness tester.
For testing, load is applied on the work piece (specimen) and a standard test bar in linear direction through a special Brinell Ball of 10 mm diameter by a hammer blow as explained below.
A calibrated bar is inserted in the square slot and the ball is positioned on a horizontal surface of the work piece such that the steel ball is caught between the top of the work piece and the underside of the calibrated bar. Next the pin of the tester is hit with a sturdy hammer. The impact load being same, the extent of indentations obtained on the work piece and the test bar depend on their hardness, harder the material less is the depth of indentation. The diameters of indentations on test bar and test piece are measured by a magnifier (accuracy of measurement – 0.05 mm) supplied with the tester. By referring to the table provided with the tester, the hardness of the specimen can be determined.
The tester is supplied with calibrated bars of different hardness. For hardness measurement, selection of a calibrated bar is done such that its hardness is approximately equal to hardness expected of the work piece. For a given hardness of calibration bar, at the ratio of the two diameters you’ve measured, a value of hardness is given, the hardness of the work piece.
Different types of portable hardness testers with some variation in design are manufactured by many companies. Blue Steel Engineers Pvt. Limited, Mumbai, India is one of them. For more information on testers manufactured by them, please visit their website – http://www.bluesteeltester.com
For more information on portable hardness testing, please refer following two ASTM standards.
A833 – Practice for Indentation Hardness of Metallic Materials by Comparison Hardness Testers.
E110 – Test Method for Indentation Hardness of Metallic Materials by Portable Hardness Testers.
Comparison of Hardness Values
To get feel of Mohs and Scleroscope hardness values, their comparison with Brinell hardness value is given below.
| Brinell Hardness, 3000 kg | Scleroscope | Mohs | |
|---|---|---|---|
| Diameter of indentation, mm | HB | ||
| 2.45 | 627 | 79 | 8.0 |
| 2.6 | 555 | 73 | 7.5 |
| 2.9 | 444 | 64 | 7.0 |
| 3.15 | 375 | 54 | 6.5 |
| 3.5 | 302 | 45 | 6.0 |
| 3.85 | 248 | 37 | 5.5 |
| 4.35 | 192 | 28 | 5.0 |
| 4.9 | 149 | 23 | 4.5 |
Durometer Hardness Test
The durometer scale was defined by Albert F. Shore, who developed a measurement device called a durometer in the 1920s. The term durometer is often used to refer to the measurement, as well as the instrument itself. It is also known as Shore Hardness. A Durometer is an instrument that is commonly used for measuring the indentation hardness of rubbers/elastomers and soft plastics. A Durometer simply uses a calibrated spring to apply a specific pressure to an indenter foot. The indenter foot can be either cone or sphere shaped. An indicating device measures the depth of indentation. There are several scales of durometer, used for materials with different properties. The two most common scales, using slightly different measurement systems, are the ASTM D2240 type A and type D scales. The scale A is used for softer materials and the scale D is used for harder materials. Each scale results in a value between 0 and 100, with higher values indicating a harder material. The indenting foot is made from hardened steel rod. Its geometry for scale A and scale D is shown in figure given below.
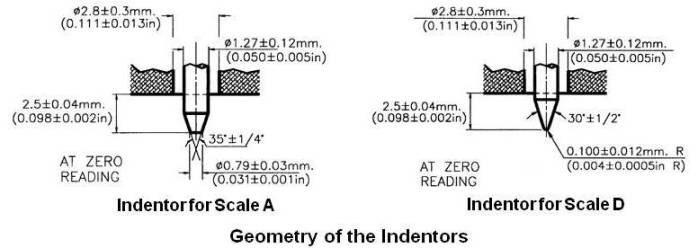
The basic test requires applying the force in a consistent manner, without shock and measuring the hardness (depth of the indentation). The final value of the hardness depends on the depth of the indenter after it has been applied for 15 seconds on the material. If the indenter penetrates 2.5 mm or more into the material, the durometer is 0 for that scale. If it does not penetrate at all, then the durometer is 100 for that scale. It is for this reason that multiple scales exist. If a timed hardness is desired, force is applied for the required time and then read. The material for test should have a minimum thickness of 6.4 mm (0.25 inch).
The geometry of the indentor and the applied force influence the measurements such that no simple relationship exists between the measurements obtained with one type of durometer and those obtained with another type of durometer or other instruments used for measuring hardness. This test method is an empirical test intended primarily for control purposes. No simple relationship exists between indentation hardness determined by this test method and any fundamental property of the material tested.
For more information on the test, please refer ASTM D2240 – Standard Test Method for Rubber Property—Durometer Hardness.
Hardness Conversion Tables
If the product specification permits alternative hardness testing to determine conformance to a specified hardness requirement, the hardness conversion tables may be used. Tables are available for nonaustenitic steels and austenitic steels. When recording converted hardness number, the measured hardness and test scale shall be included in parentheses, for example: 371 HB (40 HRC). This means that a hardness value of 40 obtained using the Rockwell C scale and converted to a Brinell hardness of 371. Occasionally hardness test is carried out to obtain a quick approximation of tensile strength.
Approximate value of ultimate tensile strength (in MPa) of heat-treated plain-carbon and medium-alloy steels can be calculated using following equation and Brinell hardness number.
UTS (MPa) = 3.4 x BHN
Tables given below are for approximately converting hardness numbers and estimating tensile strength for steels (nonaustenitic steels) and stainless steels.
Hardness Conversion Numbers and Tensile Strength for Nonaustenitic Steels
| Brinell 3000 Kg Load 10 – mm Ball |
Vickers Hardness Number |
Rockwell Scales | Approximate Tensile Strength 1000 psi (MPa) |
||
|---|---|---|---|---|---|
| C 150 Kg Load Diamond Penetrator |
A 60 Kg Load Diamond Penetrator |
B 100 Kg Load 1/16 in. Ball |
|||
| - | 940 | 68 | 85.6 | - | - |
| - | 900 | 67 | 85.0 | - | - |
| - | 865 | 66 | 84.5 | - | - |
| 739 | 832 | 65 | 83.9 | - | - |
| 722 | 800 | 64 | 83.4 | - | - |
| 706 | 772 | 63 | 82.8 | - | - |
| 688 | 746 | 62 | 82.3 | - | - |
| 670 | 720 | 61 | 81.8 | - | - |
| 654 | 697 | 60 | 81.2 | - | - |
| 634 | 674 | 59 | 80.7 | - | 351 (2420) |
| 615 | 653 | 58 | 80.1 | - | 328 (2330) |
| 595 | 633 | 57 | 79.6 | - | 325 (2240) |
| 577 | 613 | 56 | 79.0 | - | 313 (2160) |
| 560 | 595 | 55 | 78.5 | - | 301 (2070) |
| 543 | 577 | 54 | 78.0 | - | 292 (2010) |
| 525 | 560 | 53 | 77.4 | - | 283 (1950) |
| 512 | 544 | 52 | 76.8 | - | 273 (1880) |
| 496 | 528 | 51 | 76.3 | - | 264 (1820) |
| 482 | 513 | 50 | 75.9 | - | 255 (1760) |
| 468 | 498 | 49 | 75.2 | - | 246 (1700) |
| 455 | 484 | 48 | 74.7 | - | 238 (1640) |
| 442 | 471 | 47 | 74.1 | - | 229 (1580) |
| 432 | 458 | 46 | 73.6 | - | 221 (1520) |
| 421 | 446 | 45 | 73.1 | - | 215 (1480) |
| 409 | 434 | 44 | 72.5 | - | 208 (1430) |
| 400 | 423 | 43 | 72.0 | - | 201 (1390) |
| 390 | 412 | 42 | 71.5 | - | 194 (1340) |
| 381 | 402 | 41 | 70.9 | - | 188 (1300) |
| 371 | 392 | 40 | 70.4 | - | 182 (1250) |
| 362 | 382 | 39 | 69.9 | - | 177 (1220) |
| 353 | 372 | 38 | 69.4 | - | 171 (1180) |
| 344 | 363 | 37 | 68.9 | - | 166 (1140) |
| 336 | 354 | 36 | 68.4 | - | 161 (1110) |
| 327 | 345 | 35 | 67.9 | - | 156 (1080) |
| 319 | 336 | 34 | 67.4 | - | 152 (1050) |
| 311 | 327 | 33 | 66.8 | - | 149 (1030) |
| 301 | 318 | 32 | 66.3 | - | 146 (1010) |
| 294 | 310 | 31 | 65.8 | - | 141 (970) |
| 286 | 302 | 30 | 65.3 | - | 138 (950) |
| 279 | 294 | 29 | 64.6 | - | 135 (930) |
| 271 | 286 | 28 | 64.3 | - | 131 (900) |
| 264 | 279 | 27 | 63.8 | - | 128 (880) |
| 258 | 272 | 26 | 63.3 | - | 125 (860) |
| 253 | 266 | 25 | 62.8 | - | 123 (850) |
| 247 | 260 | 24 | 62.4 | - | 119 (820) |
| 243 | 254 | 23 | 62.0 | - | 117 (810) |
| 237 | 248 | 22 | 61.5 | - | 115 (790) |
| 231 | 243 | 21 | 61.0 | - | 112 (770) |
| 226 | 238 | 20 | 60.5 | - | 110 (760) |
| 240 | 240 | - | 61.5 | 100 | 116 (800) |
| 234 | 234 | - | 60.9 | 99 | 114 (785) |
| 228 | 228 | - | 60.2 | 98 | 109 (750) |
| 222 | 222 | - | 59.5 | 97 | 104 (715) |
| 216 | 216 | - | 58.9 | 96 | 102 (705) |
| 210 | 210 | - | 58.3 | 95 | 100 (690) |
| 205 | 205 | - | 57.6 | 94 | 98 (675) |
| 200 | 200 | - | 57.0 | 93 | 94 (650) |
| 195 | 195 | - | 56.4 | 92 | 92 (635) |
| 190 | 190 | - | 55.8 | 91 | 90 (620) |
| 185 | 185 | - | 55.2 | 90 | 89 (615) |
| 180 | 180 | - | 54.6 | 89 | 88 (605) |
| 176 | 176 | - | 54.0 | 88 | 86 (590) |
| 172 | 172 | - | 53.4 | 87 | 84 (580) |
| 169 | 169 | - | 52.8 | 86 | 83 (570) |
| 165 | 165 | - | 52.3 | 85 | 82 (565) |
| 162 | 162 | - | 51.7 | 84 | 81 (560) |
| 159 | 159 | - | 51.1 | 83 | 80 (550) |
| 156 | 156 | - | 50.6 | 82 | 77 (530) |
| 153 | 153 | - | 50.0 | 81 | 73 (505) |
| 150 | 150 | - | 49.5 | 80 | 72 (495) |
| 147 | 147 | - | 48.9 | 79 | 70 (485) |
| 144 | 144 | - | 48.4 | 78 | 69 (475) |
| 141 | 141 | - | 47.9 | 77 | 68 (470) |
| 139 | 139 | - | 47.3 | 76 | 67 (460) |
| 137 | 137 | - | 46.8 | 75 | 66 (455) |
| 135 | 135 | - | 46.3 | 74 | 65 (450) |
| 132 | 132 | - | 45.8 | 73 | 64 (440) |
| 130 | 130 | - | 45.3 | 72 | 63 (435) |
| 127 | 127 | - | 44.8 | 71 | 62 (425) |
| 125 | 125 | - | 44.3 | 70 | 61 (420) |
| 123 | 123 | - | 43.8 | 69 | 60 (415) |
| 121 | 121 | - | 43.3 | 68 | 59 (405) |
| 119 | 119 | - | 42.8 | 67 | 58 (400) |
| 117 | 117 | - | 42.3 | 66 | 57 (395) |
| 116 | 116 | - | 41.8 | 65 | 56 (385) |
| 114 | 114 | - | 41.4 | 64 | - |
| 112 | 112 | - | 40.9 | 63 | - |
| 110 | 110 | - | 40.4 | 62 | - |
| 108 | 108 | - | 40.0 | 61 | - |
| 107 | 107 | - | 39.5 | 60 | - |
| 106 | 106 | - | 39.0 | 59 | - |
| 104 | 104 | - | 38.6 | 58 | - |
| 103 | 103 | - | 38.1 | 57 | - |
| 101 | 101 | - | 37.7 | 56 | - |
| 100 | 100 | - | 37.2 | 55 | - |
Hardness Conversion Numbers and Tensile Strength for Stainless Steels
| Brinell Hardness (HB) | Vickers Hardness (HV) | Rockwell (HRB) | Rockwell (HRC) | UTS (N/mm2) |
|---|---|---|---|---|
| - | 640 | - | 57 | - |
| - | 615 | - | 56 | - |
| - | 591 | - | 54.5 | - |
| - | 569 | - | 53.5 | - |
| - | 547 | - | 52 | - |
| - | 528 | - | 51 | - |
| - | 508 | - | 49.5 | - |
| - | 491 | - | 48.5 | 1539 |
| 444 | 474 | - | 47 | 1520 |
| 429 | 455 | - | 45.5 | 1471 |
| 415 | 440 | - | 44.5 | 1422 |
| 401 | 425 | - | 43 | 1363 |
| 388 | 410 | - | 42 | 1314 |
| 375 | 396 | - | 40.5 | 1265 |
| 363 | 383 | - | 39 | 1236 |
| 352 | 372 | - | 38 | 1187 |
| 341 | 360 | - | 36.5 | 1157 |
| 331 | 350 | - | 35.5 | 1118 |
| 321 | 339 | - | 34.5 | 1089 |
| 311 | 328 | - | 33 | 1049 |
| 302 | 319 | - | 32 | 1020 |
| 293 | 309 | - | 31 | 990 |
| 285 | 301 | - | 30 | 971 |
| 277 | 292 | - | 29 | 941 |
| 269 | 284 | - | 27.5 | 912 |
| 262 | 276 | - | 26.5 | 892 |
| 255 | 269 | 100 | 25.5 | 873 |
| 248 | 261 | 99 | 24 | 853 |
| 241 | 253 | 98 | 23 | 824 |
| 235 | 247 | 97 | 22 | 794 |
| 229 | 241 | 96 | 20.5 | 775 |
| 223 | 235 | - | - | 755 |
| 217 | 228 | 95 | - | 745 |
| 212 | 223 | 94 | - | 716 |
| 207 | 218 | 93 | - | 696 |
| 197 | 208 | 91 | - | 667 |
| 187 | 197 | 89 | - | 637 |
| 179 | 189 | 87 | - | 608 |
| 170 | 179 | 85 | - | 559 |
| 163 | 172 | 83 | - | 539 |
| 156 | 165 | 81 | - | 530 |
| 149 | 157 | 79 | - | 500 |
| 143 | 150 | 77 | - | 481 |
| 137 | 144 | 74 | - | 471 |
| 131 | 138 | 72 | - | 461 |
| 126 | 133 | 69 | - | 451 |
| 121 | 127 | 67 | - | 431 |
| 116 | 122 | 64 | - | 422 |
| 111 | 117 | 61 | - | 402 |
| 107 | 113 | - | - | 382 |
| 103 | 108 | - | - | 373 |
For more information on hardness conversion (tables), please refer following two ASTM standards.
A370 – Test Methods and Definitions for Mechanical Testing of Steel Products.
E140 – Hardness Conversion Tables for Metals Relationship Among Brinell Hardness, Vickers Hardness, Rockwell Hardness, Superficial Hardness, Knoop Hardness, and Scleroscope Hardness.
BS 860 also gives information about hardness scales conversion.
